Pages

Showing posts with label desserts/puddings. Show all posts

Friday, December 5, 2014

Taking A French Macarons Course

Oh gosh it's been so long that I haven't blogged anything. A lot has happened and I am now back ready to revive my blog. I still love and have a passion for food, cooking and eating them. I guess I will start of by posting a class I have taken a few months ago. I was fortunate enough to get an open seat the morning of day course that had been booked for 6 months! A French Macarons Class! I've only eaten them and how I've only dreamed of making them. My dream came true! I do have cookery books and have only read them and drooled over photos. It looked and sounded very difficult to make. I'm glad that I got to learn hands on. This lovely gems are so tedious to make. Loads of steps but the finished product is well worth the time. The recipe we used came from Chef Pierre Hermes book and ooohh was it ever so delicious. We made purple lavender, orange, green mint, and white coconut with chocolate ganache.


Sunday, March 24, 2013

Churros With Cinnamon Sugar

It was spring break last week and my darling daughter was home from school. My chic-a-dis had a craving for churros, so we were in the kitchen making our very own instead of going out to a restaurant and ordering them.

A churro is sometimes referred to as a Spanish doughnut and in France choux pastry. It's quite popular in Spain, France, Philippines, Portugal, Latin America and the United States. They can be eaten for breakfast, snack or dessert with hot chocolate, coffee or tea. Well, just about anything you want to drink it with really. There aren't any rules. We like to dip ours in melted dark chocolate.


You'll need a piping bag and a large star shaped nozzle tip.

Ingredients

3 tablespoons butter
2 tablespoons caster sugar
1 cup all purpose flour
2 large eggs, whisked
pinch of salt
vegetable oil to fry them in

Cinnamon Sugar

6 tablespoons caster sugar
1 tablespoon ground cinnamon

Method

Place sugar and butter in 2/3 cup water in to a small saucepan and bring to a boil. Add the flour and salt to the boiling water remove from heat and mix with a wooden spoon until the mixture has turned into a soft moist dough. Let it cool.

Add the beaten egg a little at a time. Cover and place in the fridge until completely cooled. Fill a large saucepan with vegetable oil. Just enough oil to submerge the choux or churros. Use the wooden spatula and place the dough in the piping bag. Squeeze out any length you want out of the piping bag into the oil and snip with scissors. Fry until golden brown and set it on a plate with paper towels to absorb the oil.

On a separate plate mix the cinnamon and sugar. Roll the churros around the cinnamon and sugar until coated.

Enjoy! : )


Thursday, March 7, 2013

Chocolate Strawberry Pavlova

Here's another strawberry recipe that we love. This has been a favourite dessert that my two sweet chic-a-dis love to make. This is the second time they've made this dessert for me. The first time was for my birthday a year and a half ago. This recipe was inspired by Nigella's chocolate raspberry pavlova. We love it with strawberries. My children made this last week with very little supervision. My daughter beat the egg whites, added all of the ingredients and chopped up the chocolate chips. My son beat the cream into a nice whipped cream to be added once the meringue has cooked and cooled. I helped them place it in the oven and remove it from the oven. It was nice and perfect! Soft,chewy on the inside and crispy on the outside.


Ingredients

for the meringue base:

6 egg whites
1 cup granulated sugar
3 tablespoons unsweetened cocoa powder, sifted
1 teaspoon balsamic vinegar
2 ounces of bittersweet chocolate finely chopped

for the topping:

2 1/4 cups heavy cream
a small carton of fresh strawberries chopped
2-3 tablespoons coarsely grated bittersweet chocolate (we had small chocolate chips that we couldn't grate so we it was chopped into smaller pieces.

Method

Preheat oven to 350F and line baking sheet with parchment paper.

Beat the egg whites until satiny and peaks form. Beat in the sugar spoonful at a time until the meringue is stiff and shiny. Add in the cocoa vinegar and chopped chocolate. Then gently fold everything until the cocoa is thoroughly mixed in. Mound onto a baking sheet in a fat circle approximately 9 inches in diameter, smoothing the sides and top. Place in the oven, then immediately turn the temperature down to 300F and cook to about an hour or an hour and fifteen minutes. When it's ready it should look crispy around the edges and be dry on top. The center should feel soft. Turn off the oven and open the door slightly and let the chocolate meringue cool completely.

When you're ready to serve. Place it into a flat plate. Whisk the cream till thick but still soft and pile it on top of the meringue then scatter over the strawberries and rain over with the chopped chocolates.

Monday, February 25, 2013

Strawberry Short Cake With Dark Chocolate

This is one of my babies favourite. They love strawberries so much and this weekend there was a sale on strawberries at the supermarket. There's very little effort in creating this wonderful dessert and my little chick-a-dis had a fun time creating their own.

We used a store bought cake individually portioned, sliced the strawberries, added some whipped cream and drizzled it with dark chocolate which we melted. Voila! A very delicious dessert. My babies made this for me. : )


This has been my quick go to dessert when pressed for time. Look at all of that chocolate goodness, yum...


Ingredients

cake
strawberries
whipped cream
dark chocolate

Monday, December 10, 2012

Banana Flambé with Grand Marnier

This is really a nice treat to have anytime of the year. At least I'll have it any season there's something so comforting about it. The kiddies wanted some ice cream so I thought mummy would make it a bit more posh. I had some bananas on hand and I figured instead of making them banana split, which they would've loved anyway why not have them try one of my favourites.


Banana Flambé


Flambé is French which means to drench in liqour and ignite. I'm not one to play with fire so I did this part outside of my kitchen with adult supervision, lol ; ) The fire burns the alcohol off but leaves a nice flavour of the liqour and gives the bananas a beautiful glaze.


For my kiddie version I left out the alcohol. I served it over vanilla ice cream with wafer thin specks of semi sweet chocolate. They loved it : )

Ingredients

3 ripe bananas sliced
2 tablespoon butter
3 tablespoon dark brown sugar
1 tablespoon Madagascar Bourbon vanilla
1/4 cup Grand Marnier
tub of vanilla ice cream

* I made a separate batch for the kiddies opting out the alcohol

Method

On a non-stick skillet on medium heat melt the butter then add the dark brown sugar. Melt together then add the sliced bananas. Gently stir the bananas so that they don't break they become really soft when cooked. Add the vanilla still a gently and for the finale... Add the Grand Marnier and ignite. Do this with caution in my case I took my skillet out to the backyard.. Better to be safe and voila! Add to your ice cream..

Enjoy, TTFN!


Monday, September 10, 2012

Oven Baked Banana Boat

There hasn't been much cooking in the kitchen lately. Cold and Allergies have arrived and I've been taking care of the family so in other word I haven't had much rest. Been up most of the night with very little sleep and up very early to get daughter off to school. Mummy's don't get to rest...

Anyway, I've made this with the kiddies 2 months ago and didn't get to post it. They wanted to roast some smores. We had the chocolates and the marshmallows except for the graham crackers. What we did have was some bananas. I remember watching pioneer woman's episode when they made a banana boat while camping so we did that instead. It's really quite easy....


This is my sweet boy's boat. After I've finished slicing the banana through the center not going all the way through, he stuffed it with dark chocolate morsels and marshmallows.


This one's his sissy's, you basically add how much you want really or whatever you like in it. Like peanut butter, peppermint, caramel and so on.


Wrap them in aluminum foil and bake at 350F for about 10 minutes. Get your spoon ready and enjoy! I don't have a photo after it was baked kiddos were too excited to eat them! : )

Wednesday, August 29, 2012

Random Recipe Challenge / Orange And Peach Filo Parcels

Hello! Hello! It's been quite busy here at home for me. I'm glad to be able to participate with this month's challenge. Dom from Belleau Kitchen have got us going again with Random Recipe Challenge that he hosts every month. We are to choose a random cookbook and open a random page and create the recipe. I gave my sweet boy the honour of choosing the book since he's not able to read as of yet. The cookbook he pulled out from our mini library is The Secret Ingredient by Sally Bee.

Sally Bee is a mother of 3 children, a wife, a writer and a TV presenter. At 36 years of age she suffered 3 massive heart attacks all within a weeks time. She lives a healthy lifestyle and has no history of heart disease and neither does the rest of her family. So, it was a surprise to her, her family, and doctors when it happened. Her story has touched me in a very personal way. I felt how she was feeling when she was telling  her story and while she was slipping away at the hospital, except it wasn't my heart It was my lungs. She is a living miracle as there is no cure for what she has. She tries to live a full life and be as healthy as she possibly can be. This was the cookbook I mentioned in my previous post that I found on the clearance table. I would've gladly paid retail for it. It's full of healthy recipes that she prepares for herself and family. My sweet boy opened the book to a random page. The kiddies eyes grew with delight when the page opened and they saw a photo of an Orange and Peach Filo Parcels. They were quite excited that we took our book with us to the supermarket and got all of our ingredients.

This recipe is quite easy but I've never worked with filo pastry before. I started out calm and collected then when it came to the part I had to separate the filo's to brush some oil on them, it kept breaking to pieces. The first filo I didn't mind breaking since I was learning how to handle them. Then the second one broke as well, I was still alright thinking to myself I'll get the third one right. They crumbled again!! It was 6 filo pastry I've broken! My face started to change and my forehead began to develop lines which looked like I'm in need of botox! I was having a kitchen nightmare with such a simple recipe. Don't get me wrong its not her recipe its me and my war with the filo pastry! "Oh its on baby!" The hubs wondered what the heck was going on in the kitchen! I had to ask my sweet boy/sous chef that mummy had to do this one alone for the sake of all the filo's I'm about to wrestle with. Didn't want him to see me sweating over thin little papers... lol. Finally!! The seventh filo didn't break I was very careful with them until I had to put them in the ramekins! They started cracking again! I could not get it nice and pretty as her photo and how she suggested to place them in the ramekins and twist the top of the filo so that it wraps the filling inside. I started pushing them in the ramekins and wrapping it like a burrito as they kept breaking and drying.

This was a definite Recipe Challenge for me....I tried to keep the filo's from drying by rolling the plastic back on the and covering it with a cloth but I'm guessing its the hot temperature and zero humidity we have here. I don't know it's my first filo experience. At the end of it all we had a delicious treat to eat and everyone was happy : )


This is what it looked like taken out of the ramekin. It's meant to look like a parcel with the top looking like a Victorian ladies draw string purse. Not even close...I shall keep trying and master how to work with a filo dough.


She's inspired me to live a full and healthier life for myself and my family and I shall try to cook a much healthier meals for us.

Ingredients

3 oranges
3 peaches and nectarines
2 tbsp maple syrup
50ml/2fl oz/1/4 cup water
1 tbsp light olive oil
12 sheets filo pastry, each cut 18cm/7in squares
icing (confectioners) sugar to dust
6 x 9cm 3 1/2 in diameter ramekin dishes (I've used the only kind I got, not sure what size it is)

Makes 6 Parcels

Method

1. Preheat the oven to 200C/400F/Gas mark 6.

2. Using a small knife, remove the peel and pith from the orange and cut in between each segment.

3. Wash and slice the peaches into small pieces as the orange segments.

4. Put the fruit, maple syrup and water into a large pan and simmer over a medium heat for 3 minutes.      Remove from heat and strain over a jug, saving the juices for later. Lightly oil the ramekins.

5. Brush one of the filo squares with a little oil then lay another square on top and brush again. Turn over so that the greased side is facing down then gently push the double filo squares into the ramekins,

6. Repeat with the remaining pastry to line the remaining ramekins.

7. Divide the fruit among the ramekins. Gather up the filo edges and twist together lightly seal. Transfer ramekins to a non-stick baking sheet and bake for 25-30 minutes, or until crisp and golden.

8. While your parcels are cooking pour the juices into a small saucepan and simmer until reduced by half.

9. When the parcels are cooked, remove from the ramekins and put onto plates. Dust with icing sugar and serve with the reduced juice poured over.

Enjoy!!!


Monday, May 28, 2012

Pulled Pork And Strawberry Shortcake

Summer's definitely here! It's been very hot here lately so I've been taking the kiddies out to the pool. Yesterday was family day so I've planned what we were going to do and that's to go out to the pool and swim. Do you ever find yourself quite hungry after swimming? We do.

This time I was prepared I decided to make Honey BBQ Flavour Pulled Pork. I went to the supermarket and purchased all of my ingredients and got everything in the oven before we went swimming. This roast was cooked in the oven for 6 hours and oh my gosh! The meat just fell apart after it was cooked and it melted in your mouth like butter.


This is an 8 lbs. roast that was cooked in a Dutch oven with Honey Barbeque Sauce. We took it out the dutch oven, placed it in a shallow bowl and pulled it apart with forks. It wasn't much work since it fell apart so easily.


After I've skimmed the fat off its juice and BBQ sauce we placed the roast back in its sauce to absorb more of the flavour.


For our sides we baked a Southwestern Potato Au Gratin from a carton and some Garlic and Herb mash. I couldn't be bothered to make it from scratch instead it was semi homemade and it was really good!


Supper!!! Yummmmmmmm..........


A meal is not complete without dessert. The kiddies and I assembled our own Strawberry Shortcake and the dark chocolate drizzle was a must!!

Today, were doing and eating the exact same thing again....: )

Ingredients for our version of Strawberry Shortcake..


Ingredients

8 lb. Roast Pork
2 onions
Honey BBQ sauce
2 cloves garlic (I forgot to add)

Method

Preheat oven to 300F.
Place quartered onions on the bottom of  Dutch oven.
Place the meat on top of the onions and drizzle with BBQ sauce all over.
Cover with lid and put it in the oven and cook for 6 hours.


Monday, May 14, 2012

Black Forest Cake

My my, I've been gone for a while. It's been pretty busy around here. My cake design classes have started and my daughter had just turned 12. For her birthday she asked me to make her a Black Forest Cake. It had to be designed like the one from a video game that her and her friends play called Portal. I was a bit intimidated at first since it's my first time baking one and designing one like it. I wanted it to be special and spectacular for her. I searched the web on what the cake is meant to look like and this is what mine turned out like. I wanted it to be very similar and to taste great as well.

Garnishing this cake was a very messy situation. I had chocolate bits melting all over my hands. I've had to wash, rinse and dry my hands every time the chocolate started to melt. I'm sure all you bakers out there know a better way of garnishing an entire cake with chocolate crumble without having to be messy. The instruction says to gently press the crumble on the cake. I tried that and they would fall off my hands creating a mess. Instead, slapped them on before they melted on my hands. I got the same result, a mess everywhere. There were chocolate crumbles all over the kitchen counter, floor, my clothes, face, hands, my son's face, around his lips and of course inside his mouth ha ha ha ha ha lol.... : ) He told me the bits wanted to go inside his tummy, lol ha ha ha ha ha!

Oh, and by the way this is the first time I've baked a cake with chocolate milk as one of the ingredient and it really made the cake quite moist.


The video game version looks like this...


My daughter and one of her best friend made the mini portal cupcakes and it turned out rather nice as well...


I browsed loads of recipes for this cake and the one that I chose is from Sandra Lee. It looked like the easiest one for me to make. Although her original design for her Black Forest Cake is different from what the portal cake looked like, I just had to design it differently.

This is her cake design courtesy of Semi-Homemade Magazine...


I just had to make some minor changes on the ingredients and design.

Ingredients

1 (18.25-ounce) box super moist chocolate fudge cake mix, Betty Crocker
1 2/3 cups chocolate milk
1/2 cup vegetable oil
3 large eggs
5 tablespoons unsweetened cocoa powder (will need to divide 3tbs and 2tbs)
3/4 cup cherry pie filling
1 (12-ounce) container frozen nondairy whipped topping, thawed

Garnish: 2 bars of your favourite bittersweet dark chocolate (one of mine is Ghirardelli )
Maraschino cherries

Method

1. Preheat oven to 350°. Spray 2 (9-inch) cake pans with nonstick baking spray with flour.
2. In a large bowl, whisk together cake mix, chocolate milk, oil, eggs, and 3 tablespoon of cocoa until smooth. Divide batter evenly between prepared pans. Bake for 20 to 24 minutes, or until a wooden pick inserted in center comes out clean. Let cool in pans for 15 minutes. Remove from pans, and cool completely on wire racks.
3. Spread cherry pie filling between layers.
4. Add 2 tablespoon of cocoa powder to whipped cream to add a bit of brown then spread topping over top and sides of cake.
5. Blitz 2 bars of bittersweet dark chocolate in the food processor.
6. Gently press chocolate crumble onto sides of cake and top of cake. (I slapped mine on...lol) Top cake with small whipped cream circle using cake decorator tip # and cherries. Store in refrigerator.
Makes 1 (9-inch) cake

*Cupcakes ingredients were exactly the same except the kids didn't bother with the cherry pie filling.


Sunday, April 22, 2012

Canelés

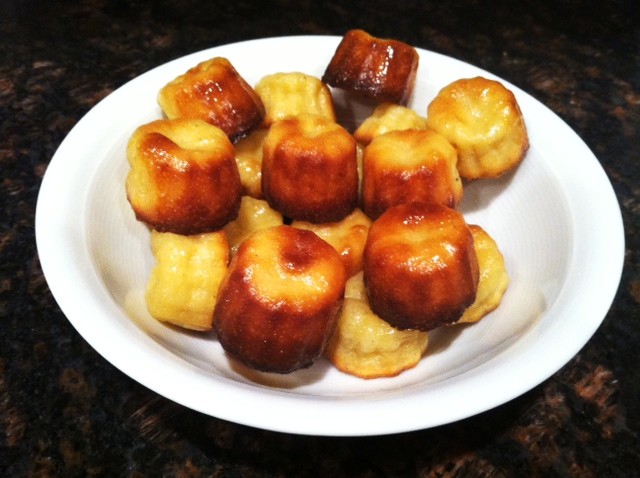
I saw these handsome little beauties a few months ago from another blog. When he described it to be a crème brulée in a cake form, I immediately fell in love. Crème Brulée is my first love and always will be but to entice me with such as this! I felt as if I was unfaithful. I've attempted to recreate his recipe and I just can't get the baking time right or maybe my oven temperature or both. None the less, I am in love with them.

(photos were taken from my phone)


I began with boiling the sauce together.


..mixed the flour, eggs, sugar, sauce and rum to create the batter..


..poured it in the mould..


..naturally my sweet boy was in the kitchen with me, watching them bake just as excited as I am..


..it was as if we were watching a symphony, they were bubbling and rising rapidly from every mould..


..they started to slow down a bit towards the end..


..our first batch is done and they are beautiful..


..this was baked at 210C as suggested which I converted to 410F for 35 minutes. It didn't caramalized all around and some didn't at all..


..I tried again with a second batch..


..this one I had baked a little longer 45 minutes. I was afraid of burning them I got some caramalized  about 5 pieces..


..they were one of the best treats I have ever tasted. It was as if I bit into a love spell. It was just like how he said it would be, a Crème Brulée in a cake form. Sigh.......

For the complete history and recipe of these little magical treats please visit Phil in the Kitchen at As Strong As Soup he is the one I thank for this new love. I shall keep on trying and get the temp and timing perfectly.


Saturday, October 29, 2011

Chicken Tarragon

Last night's Fun Friday Supper was Chicken Tarragon with brown rice and green beans. For dessert Flourless Chocolate Cake. Another favourite of the family.


 This dish is amazingly easy to make and incredibly savoury. The family have agreed this is going into our Family Recipe Book that I'm creating for our lovely kiddies. It will be filled with all of their favourite dishes and desserts. Another project of mine with the help of my kiddies. This is just a recipe book that will belong to the kids for fun. Something they would always keep as they get older.

(will post recipes in a moment) I get so busy with the little one's I have to stop in between blog and tend to their every need. I know all of you Mums and Dads would agree.

Right, here's the recipe

Tarragon Chicken

2 teaspoons olive oil (unless you have garlic flavored oil)
dash of garlic powder
cut onion into quarters and chop up 1/4 of it
1/2 teaspoon dried tarragon
2 chicken breast fillets, skinless and boneless
1/3 cup white wine
1/4 teaspoon table salt
1/2 cup heavy cream
fresh white pepper to grind over
2 teaspoons chopped fresh tarragon and a pinch for sprinkling

Heat oil in Dutch oven. Add onions stir, add dried tarragon, stir again and cook for a minute.

Put the chicken fillet in the pan curved side down and cook for 5 minutes. If the onions look like their starting to burn scrape them from the pan and let them rest on the chicken.

Turn over the chicken and add the white wine. Let the wine bubble up then add salt. Put the lid on and cook on low for 10 minutes. Check the chicken if its cooked by slicing through the center. Making sure there isn't any pink. Cook longer if there is.

Remove chicken breasts to plates. Bring the liquid to a boil, add the cream and stir well, then sprinkle in the fresh tarragon, stir again and give a good grind of pepper.

Pour the sauce over the chicken and give the final sprinkle of tarragon.

Serves 2

I've doubled up the recipe to serve the 4 of us.